August 2022
When a practitioner decides to use a theory or philosophy, they realize that it isn’t a cookbook. You use the parts that apply to your unique situation and disregard the rest. Failure to do this results in project failure because the theory or philosophy, except perhaps in a laboratory environment, you cannot have the exact same conditions as the author of the theory or philosophy. What this means is: don’t drink all the Kool-Aid.
Once I decided to embrace the Layens method, I realized there was a lot of stuff to be done. It looked like I needed to build frames, hive boxes, and something called swarm traps. Fortunately, I found a website that had downloadable plans for everything I needed to build www.horizontalhive.com. I also ordered two books from the website: Keeping Bees With a Smile and Keeping Bees in Horizontal Hives: A Complete Guide to Apiculture. The links are from Amazon because I couldn’t find a direct link to the books from the actual website I purchased them.
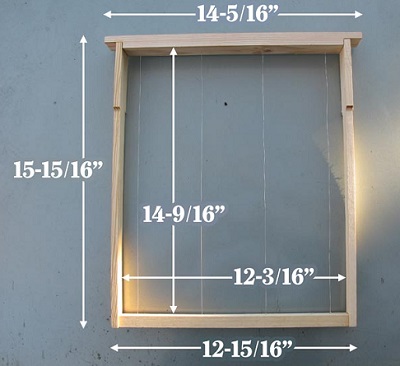
Layens Frame Construction

When I started reviewing the plans I downloaded, I determined that it would be more cost effective to build 3 hives from 4 pieces of plywood than to try to plan out the cutting needed for 1 hive.
Since there are a maximum of 20 frames per hive (assuming full utilization), I would need at least 60 frames.
Looking over the dimensions of the frames and taking stock of how much wood I have from old projects, I realized that I could make the majority of the needed frames and cleanup the garage at the same time.
The only real problem was me. I hadn’t used any power tools since I had COVID and I could barely remember anything at all about their usage.
The plans for the frames can be found at this link: https://horizontalhive.com/how-to-build/layens-hive-frame-plans.shtml. These proved to be very helpful.

Cutting out the blanks for the frame parts was and is pretty uneventful. It took awhile for me to regain the confidence that I used to have using power tools, but that was expected.
One thing did come up while shaping the blanks into component parts. The side boards have a taper that starts about an 1 1/2 inches from the top ran continues to the bottom of the piece. Dr Leo Sharashkin, who resides in Cabool, MO, who created, or at least published, the plans used a router to complete this step. I tried and managed to burn up the router bit in just a few minutes. Now, what do I do?
I looked across the garage, where the power tools are stored and saw a taper jig that I had purchased from Rockwell Tools several years ago. The only problem was that the handle was missing. Serious problem.
I thought about it for a bit and then designed one using Fusion 360 and printed it out on my Fokoos 3d printer . The picture is shown below.


The purpose of the taper is to allow the bees to go from frame to frame. This is part of the idea of “bee space.” The use of a router might have provided a little more space, but using the taper jig was much more convenient for me.
After the first sets of frame parts were finished, it was time to assemble the frames themselves. Like most things this was not a straight forward process.
Almost time to assemble the frames
First I had to build an assembly jig. This little jewel saved a lot of time and helped prevent mistakes from occurring.

The plans for the assembly jig can be found in this link: https://www.horizontalhive.com/how-to-build/assemble-layens-frame-jig.shtml.
Still not quite ready for full assembly
It’s hard to see from the pictures, but there is a piece of wire that runs up and down the length of the frames, essentially making 4 quadrants. While this can be done by hand it was much more efficient to build a wiring jig show below.

The link for the wiring jig: https://www.horizontalhive.com/how-to-build/layens-frame-wiring-jig.shtml.
With all the prerequisites completed, it was time to assemble the first group of frames.


It did feel good to have actually accomplished something other than research.
Last modified
Leave a Reply